|
Looking for a great fast finish & festive look for your upcoming holiday pieces? Have lots of gifts to make and not enough time? Try antiquing with Color! Blues & Teal are beautiful winter colors and applying them as an antique creates a stunning effect in minutes. I used to do many holiday craft shows and had great success with lighted scenes, villages, churches, trees and more painted this way and because they were beautiful and fast to paint, I sold many! I had several different shade options and they sold like hotcakes! Especially nice for villages and scenery that could otherwise be tedious and these are very festive and beautiful when lit. It's Quick & easy.
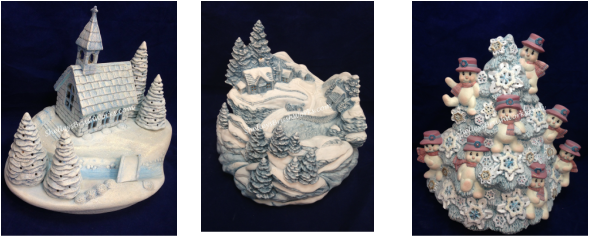
1. Simply base coat the piece in a light color - white is perfect, but you can branch out and try other pastel shades like light gray, powder blue, etc. and get many different looks. 2. Paint on your antique and wipe it off with a clean dry rag or soft paper towel like Viva. 3. Highlight - If using an oil based antique (which I prefer, you can wipe back further while still damp, with a little mineral spirits on a rag or soft paper towel for additional highlight on areas like snow, windows, etc. Also use this to wipe back any streaky areas and to clean your brush. If you are using a water based product you can use water on your towel the same way. Oil wipes off smoother in my opinion but if you are using a water based product just be sure to paint smaller areas and wipe each off while they are pretty wet before moving on. I wiped the snowflakes on the tree pictured above almost back to white to add highlight and contrast from the rest of the tree. The two scenes pictured - all the snow was wiped back Also use this to remove any streaks or uneven areas and to clean your brush. If you are using a water based product you can do this with water on your towel. 4. Shading - you can shade in some darker areas like rivers, mountains, trees, roof tops etc with darker shades of blue or teal or even a little green as long as it is in a matching shade. You can do this with any translucent product (Paintstiks, Fashenhues, Kimple Intense translucents, Even use a wash of acrylics or chalk if you allow any oil based antique product to dry completely first.) I used Blue PaintStiks in the river of the church scene and just applied the antique a little heavier to the trees in the middle scene. I added pink hats and scarfs with acrylics to the tree on the right just to give some accents. On the middle scene, I would usually add a teal green to the trees and various shades of darker blue to the buildings - not a lot, just enough to give it some interest. If you want to know more about using Translucents I have a "How to Use Translucents (or Fashenhues) Technique Downloadable PDF Packet and "How To Use PaintStiks (Oil Sticks) in my online store. Both product lines are great to use with this technique. Take a look! 5. Embellish & Accent - Spray your piece with a matte sealer, then Add No fire Snow and glitter for final touches to create further bright white contrast and and texture with the snow, and glitz with the glitter. (I always spray before glitter so it doesn't dull the shine.) You can put the clean multi color diamond glitter on the whole thing, or just on the snow areas. You can also use other colored glitters like blue, gold and silver and green to accent. The tree has gold and turquoise glitters on the snowflakes. The scene on the left has a fine diamond glitter on everything, which doesn't show up well in the picture, but is beautiful in person. The middle scene has no fire snow and glitter on the snow areas. You can even add some pearl white or pearl blue in areas to spruce it up. Have fun and experiment! Depending not the piece, add light and maybe bulbs or glue on a ribbon or add a holiday floral pick from the craft store and walah! you have a beautiful piece that was fast and easy! If you are a crafter, this is a money making technique. Oil based translucent stains used to be plentiful and many companies had a variety of color options, but now are a little more challenging to find. Kimple's Shimmering Blue Paste antique is one of my favorites to use as it has little flecks of sparkle in it. Dona makes a great Blue antique. Doc Holliday makes a product called "Antique It". You can mix this 50/50 with any acrylic to turn it into an antique or less acrylic to keep the shade more translucent. I prefer oil based antiques because they wipe off smoother and cleaner, but if you can't find the color you want this is a great option. Just be sure to only paint a small area at a time wiping each section off while it's still very wet. Oil based products are becoming more and more difficult to find, so keeping some of this Specialty product on hand is a great idea. Other colors work great as well. I have a nice plum color which works great at Valentines and I have used it for Christmas and easter as well. Have fun experimenting & Happy Painting! Antiquing is a very versatile product that helps us create many different effects. It should be applied over an acrylic base coat (which acts as a sealer and stops the antique from soaking into the bisque), and then wiped off with a paper towel or soft rag (like a t-shirt), leaving it only in the crevices. Oil base antiques in my opinion are the most effective and clean up is done with a mineral spirit product (there are other options). There are also water based antiques, these clean up with water but do not wipe off as smoothly or as evenly and do not give the same satiny finish.
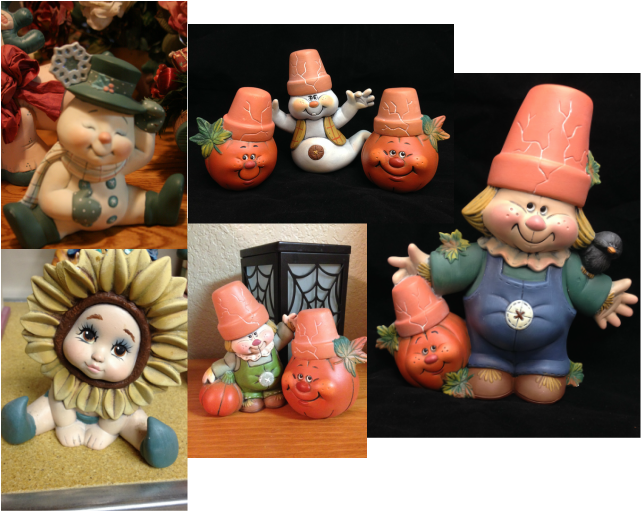
It can several purposes, I'll just name a few: 1. By leaving a little of the antique behind in the cracks and crevice detail, it can create depth, shadow (and contrast if the antique is quite a bit darker than the base coat). 2. It would also camouflage uneven or messy lines and borders left behind by shaky hands. 3. The antique would change the shade of the acrylics. Using different colors of antique over different colors of acrylics can create many options for shading. For example, If you wanted a nice leather look, you can paint a tan base coat on, which alone, is pale and flat and all one shade leaving it very uninteresting and not very authentic for leather, but by antiquing it with a rich brown you transform it to a darker shade, creating a basic leather or wood look. It can also tone down a bright shade, which can be a negative if you are not aware of that before starting. 4. It changes the texture and finish of the piece from matte and rough to smooth and satiny. Painting antique ON TOP of your final colors: Years ago the most common use for antique was just to paint your piece the individual colors of acrylics you want on each area (skin, hair, hat, shoes, coat, etc) and then paint antique over the top of your piece after it dries and wiping it down, spraying it with sealer and calling it good. However, there are many different ways to incorporate antiques into your painted pieces. I don't normally use this method for an entire piece, but I do use it for things like skin tone, leather, wood etc. Small areas on a piece that can just be antiqued and look fine being left alone after that. Painting antique UNDERNEATH your final colors: I rarely ever use antique as the final finish for an entire piece. Most of the time I use the antique in the middle of the process, after initial base coating, but with full intentions of painting something over the top of it to be my final finish. I may base coat with primer and use antique to get depth, then use translucents' to give color and final finish. I may base coat with all one color or multiple colors, then antique to get depth and a satiny finish to use PaintStiks for color and final finish. I may base coat and use antique to get depth, then wet brush or dry brush to get texture and change color. And sometimes, I amy base coat a piece (could be all one color or each area different according to piece) and the antique to get depth, then paint with acrylics again on the top. One such example is what I call "Reverse Antiquing" as shown in the pictures above. These were all base coated with a light gray and antiqued with black (with the exception of the snowman, which was base coated light gray but antiqued with a dark teal and the terra-cotta pots on the other pieces were base coated with a terra-cotta color and antiqued with white). Then I used acrylics, thinned with water slightly, and loaded onto soft blended hair taklon brushes (mostly flat shaders). I painted each area the color I wanted it to be keeping the color thin and slightly "see through" so the black crevices in the detail areas would show through. I used a swiping back and forth motion to get the color to apply thin and even, and then move on, not retouching an area it as it starts to dry - or you will just remove it and gouge a hole in your color. I did not take the color clear to the edge, I left the dark crevices showing and when possible, angling my brush so the acrylic paint floated over the top of crevices so the paint didn't go down into the detail. Be sure the brush is not loaded so full that the paint is dripping and running or the paint will run into the crevices. If you have an area that is streaky. Let the first coat dry, then swipe over it lightly again to even it out. Some areas, will just look solid, like the snowman's hat and shoes, but that's okay those are smooth areas without any detail to show through. The buttons, I did just paint solid - but the overall piece still has the soft effect. This is similar to how you would apply translucents' - but the difference is in the finish - the translucents' will look see though every where - using acrylics with this method, the colors look for the most part solid, but the cracks shows through. Why wouldn't you just paint the colors on and antique with black on top of it? You could, but the colors will all be dull and dark because the black will change the shade of each color it goes over. This method keeps the colors bright and clean looking as opposed to dull somewhat dingy. This method gives it a little softer look while keeping the colors as bright as you want. I hope this helps a little and gives you some courage to try something new! Feel free to comment here or ask questions and I will give you as much detail as I can to help you be successful! Happy Painting! |
Shelley Long
Ceramic Artist & Teacher 
_I will share various tips for painting on this page, I hope you enjoy
them! Please feel free to ask questions or comment, it's always nice to
hear from other painters and I am happy to help any way I can! I will be adding various technique packages to the online store and when I
do I will post an update here to let you know a technique has been
added. Check back soon tips !
God Bless & Happy Painting! Shelley Receive Updates
program for scheduling - by BookFresh Categories
All
Archives
March 2016
Back to
|
