Shelley's BrushWorks Studio
  • Home
    • Store >
      • Supplies
      • Streaming Video
      • How To Technique Packets
      • Video Downloads & DVDS
      • Learning Center >
        • Techniques
        • Painting Tips Blog
        • Q&A
        • Free Projects
      • Policies
      • Projects Packets
    • About
  • Gallery
  • Contact Us

Shelley's BrushWorks Studio

Wet Brushing & Dry Brushing Part 2: Pros & Cons, which works best for what?

12/11/2011

Comments

 
You may find that the pros and cons listed below are not consistent with your experience, however, keep in mind that this is what I have found to be true based on my personal experiences painting and from years of teaching hundreds of different individuals with varying skill level both techniques.

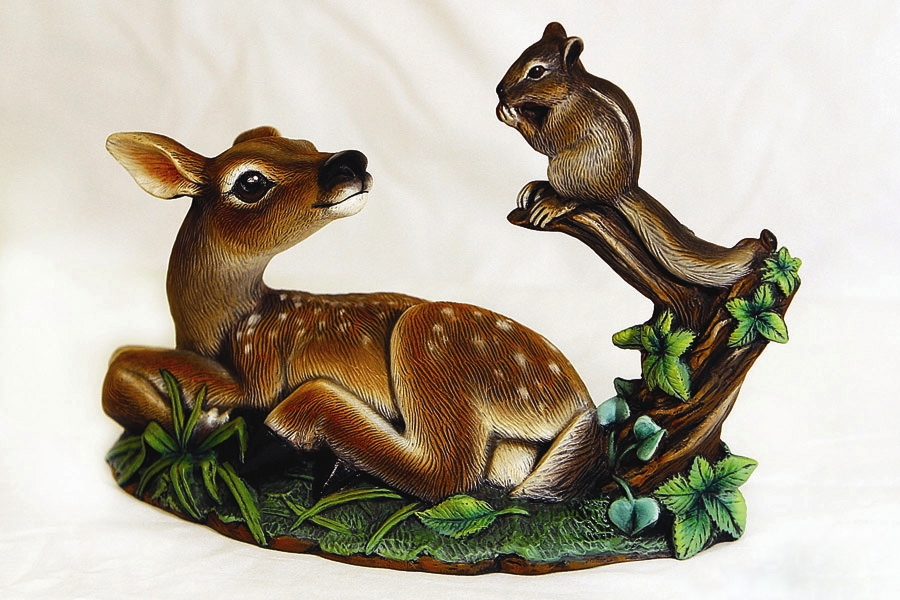
Dry Brushing
Results:  When applied correctly, texture is all over fuzzy and even, and can even be almost solid if desired by applying more coats. Colors tend to be more “muted” or dull.  This can be a pro or a con, depending on the effect you are after.  Some people use a larger back and forth brushing motion while others prefer short quick strokes like a scrubbing motion, this can change the results.
Pros: 
  • This technique works really well when more of a soft or fuzzy / hazy” appearance is desired.  Although there is still detail and depth achieved with this technique, while using the stiff bristles brush in a scrubbing or brushing motion, a light fuzzy layer of paint is deposited in the crevices, making the detail softer, or less “crisp”.  It works well when an all over even look is desire on smooth or almost smooth surfaces.
  • Highlighting is easy to achieve with this technique by simply adding a lighter shade to your brush and hitting the areas again that you would like lighter.  When proper technique is used the blending can be seamless and smooth.
  • Many of the “cutesy” pieces from companies like Dona’s  & Clay Magic, etc. are nicely done in this technique because it is a softer look.  (Example: See the Bunny with Eggs for sale, or the Sitting Snowman in front of the reindeer and sled, both in the holiday section of my photo gallery for an example).
Cons:
  • It takes longer than Wet Brushing due to the fact that color is usually applied in several light coats to keep it even and consistent.  It takes a little effort to be sure the brush is dried and adequate paint is removed after each loading before touching to the piece to assure you don’t get any blotches or streaks.
  • It can be a challenge to keep “dry” brushes on hand when you are changes colors frequently.  You may need to have more than one of each size brush to make painting more convenient. 
  • Brushes need replaced more often because the scrubbing motion of dry brushing is very hard on the brush and because the bristle is stiff, it breaks off easier.
  • Brushes are better after they are “broke in”.  I find that my brushes are better after several uses and the bristles have broke down a little and are more fluffed and flared out.  They are not optimal when they are brand new, in the same token, when they have been overused, the bristles become too short and no longer have moment which can make brush strokes and streak marks on your piece which is not desired.  If a brush is too short or too hard, it can actually break a “hole” open in your color as you are scrubbing or brushing.
  • Fuzzy overlapping can require repeated basecoat touch up.  When you want to get one area dry brushed edge to edge, your brush dusts against the bordering areas, depositing a fuzzy halo on the border.  In order to keep colors crisp and edges neat, it is best to repair those areas by touching up the basecoat and letting it dry before dry brushing those areas.  This can be a big problem if you get that halo on an area that you have already dry brushed and repair becomes more difficult.  In these cases you may need to switch to a stiff square brush that will allow you to get closer to the edge without overlapping.  Sometimes the fluffy texture can be compromised because the square brush does not give the same fluffy texture as the round but if you are careful you can become good at maneuvering in these tight areas.
Wet Brushing

Results:  When applied correctly the texture achieved varies with the detail and typically takes on more of a solid appearance with the majority of shading in the deeper crevices.  The brush strokes themselves leave behind texture that enhances the technique.  Colors tend to be richer and brighter.  Contrast is sharper which can be a pro or con, depending on desired results.

Pros:
  • Results are achieved very quickly and one coat is usually adequate in most places making this technique very fast. 
  • Detail is crisp because the paint stays mostly out of the crevices creating the sharper contrast from the dark basecoat to the light shade being applied with the Wet Brush stroke.  
  • Because square brushes can be used in a “plant and Pull” method, borders get painted completely without overlapping any other area, requiring less touch up. 
  • Highlighting and blending is done easily by adding color after color to the brush and applying wet color on wet color allowing it to blend with each brush stroke. Color blending can be seamless when applied correctly. 
  • Because Wet Brushing is rich and applies mostly smooth as opposed to fuzzy, it pairs nicely with corner load shading, making the results of the combination amazing.
  • Colors are rich and bright because they are applied nearly full strength in a single coat.  Due to this, pieces done in this technique stand out and it works really well for animals, scenery, holidays, etc. (Example:  All the animals and dragons in my photo gallery are done with Wet Brushing)
  • Softer effects can be achieved by choosing a basecoat that is only a few shades darker than the desired outcome, vs. base coating in a shade that is a big contrast.  (If a soft white is desired, basecoat in medium to light gray rather than black.  See the article on “Choosing a base coat”)  Using this approach makes this technique also nice for “Cutesy” pieces.
  • Brushes can be washed and used immediately.  You can get by with only one brush of each desired size just fine.  Brushes last longer because they are not used as aggressively as with Dry Brushing
Cons:
  • It is more important that you hold your brush at the right angle with this technique because it is fully loaded and wet and can be easy to place a “blob” on the piece.
  • You must properly “bleed and blend” your brush each time you clean or change brushes and load new color.  If you don’t learn to do this correctly it can be frustrating.
Summary:
In my opinion, Wet Brushing is much quicker, more versatile, and produces a nicer finish on most pieces than Dry Brushing.  I find I get better results with Wet Brushing in almost every setting.  I might choose to Dry Brush if I had a “cutesy” piece that had mostly smooth or slightly bumpy texture (snowman or stuffed animal fur) and I wanted to achieve an all over even fuzzy texture.  Even still, I would still debate if another approach to the piece using wet brushing would work because of the time it would save.  I may also choose to Dry Brush if I am using a stencil or want that “stenciled” look without breaking out my airbrush.  With that being said, I know there are many talented painters out there that get amazing professional results with Dry Brushing, again, I am speaking from my experience.

Like anything it is important to learn the proper technique and practice to improve your skill before you will see consistent results.  When you do it correctly it is very easy.  When you are not doing it correctly you will become very frustrated and likely discard it all together.  I had a choir teacher that engrained this quote in my head “practice does not make perfect…it only makes permanent”.  I learned that if you continue to practice something the wrong way, you’ll permanently do it the wrong way, thus creating bad habits that are hard to break.  In my years of helping people Wet Brush, the people I have run across that don’t like wet brushing have usually been doing it wrong and or have dry brushed so long that they are combining to two techniques while learning and not getting either positive result.  If you find yourself in this boat, I challenge you to hang in there and stay tuned.  I will be posting a “how to” on both techniques and following that up with a short video tutorial.  Although I use Wet Brushing 80-90% of the time, I still believe it’s very important to learn how to do both to be a well-rounded painter.
To be continued...
Part 3:  How to Dry Brush
Part 4:  How to Wet Brush

Will be posted soon.
                                                                                                                                      Happy Painting!
                                                                                                                                               Shelley
Comments

    Shelley Long

    Ceramic Artist & Teacher

    Picture
     _I will share various tips for painting on this page, I hope you enjoy them!  Please feel free to ask questions or comment, it's always nice to hear from other painters and I am happy to help any way I can!   I will be adding various technique packages to the online store and when I do I will post an update here to let you know a technique has been added. Check back soon tips !

    God Bless & Happy Painting!
    Shelley

    DMCA.com Protection Status
    Picture

    Receive Updates

    Sign up to be notified when new tips, projects or resources are posted.

    * indicates required
    program for scheduling - by BookFresh
    Shelley's BrushWorks Ceramic Studio | Promote Your Page Too

    Categories

    All
    Antiquing
    Base Coats & Antiques
    Doc Holliday
    Finishing Touches
    Fused Glass Painting
    General
    How To's
    Questions & Answers
    Tips
    Washes & Shading
    Wet Brushing / Dry Brushing

    Picture

    Archives

    March 2016
    January 2016
    December 2014
    November 2014
    October 2014
    March 2014
    August 2013
    November 2012
    February 2012
    January 2012
    December 2011


    View my profile on LinkedIn
    Picture

    Back to
    Other Pages


Our Company

Home
About Us
Contact Us

Store

How To Techniques
Project Packets
Videos -DVD's
Videos -Online
Supplies


Learning Center

Techniques
Painting Tips
Q&A
Free Projects
Picture

Photo Policy

Copyright © 2009 | 
DMCA.com Protection Status
  • Home
    • Store >
      • Supplies
      • Streaming Video
      • How To Technique Packets
      • Video Downloads & DVDS
      • Learning Center >
        • Techniques
        • Painting Tips Blog
        • Q&A
        • Free Projects
      • Policies
      • Projects Packets
    • About
  • Gallery
  • Contact Us